Breadman Ultimate Instruction Manual: A Comprehensive Guide
Welcome! This detailed guide unlocks the full potential of your Breadman Ultimate, offering step-by-step instructions,
troubleshooting, and delicious recipes for perfect loaves every time.
From initial setup to advanced baking techniques, this manual ensures a rewarding bread-making experience,
leveraging both the machine’s capabilities and user feedback from online communities.
Discover how to utilize features like the delay timer, crust control, and various cycle options,
along with essential tips on ingredient quality and accurate measurements for consistent results.
Congratulations on acquiring the Breadman Ultimate! This bread maker represents a significant step towards enjoying fresh, homemade bread with ease and convenience. The Breadman Ultimate isn’t just an appliance; it’s a gateway to a world of culinary creativity, allowing you to experiment with diverse flavors and textures.
This model, often found well-preserved even decades after its initial release (circa 1998-2001), boasts a robust design and a user-friendly interface. However, many users initially find the included manual lacking in detail, prompting a need for a more comprehensive guide – which is precisely what this document aims to provide.
Whether you’re a seasoned baker or a complete novice, the Breadman Ultimate offers a range of automated cycles to suit your needs. From basic white bread to whole wheat variations, sweet treats, and even gluten-free options, the possibilities are endless. Before your first bake, it’s crucial to understand the machine’s components and functionalities, ensuring a smooth and satisfying bread-making journey. Remember to run the Rapid White Cycle initially to burn off any manufacturing oils!
Unboxing and Initial Setup
Carefully unpack your Breadman Ultimate, ensuring all components are present. You should find the bread maker itself, the bread pan, the kneading paddle, and potentially a recipe booklet (though supplemental guidance is recommended!). Inspect for any shipping damage before proceeding.
Before the first loaf, a crucial initial setup step is required: running a “burn-off” cycle. This eliminates any residual manufacturing oils or odors. Utilize the Rapid White Cycle, following the instructions in the full instruction manual. Do not add any ingredients during this initial cycle; it’s purely for cleaning and preparation.
Place the bread maker on a stable, level surface, away from water sources. Ensure adequate ventilation around the machine. Familiarize yourself with the power cord and plug, and avoid using extension cords if possible. A thorough unboxing and setup will contribute to the longevity and performance of your Breadman Ultimate.
Understanding the Control Panel
The Breadman Ultimate’s control panel is your command center. It typically features a digital display, cycle selection buttons, crust control options, and start/stop controls. The digital display shows the current cycle stage and remaining time. Cycle selection buttons allow you to choose from pre-programmed settings like Basic, Whole Wheat, French, and Dough.
Crust control settings usually offer options for light, medium, and dark crusts, adjusting baking time accordingly. Pay attention to buttons labeled “Start,” “Stop,” and potentially “Pause.” Some models include a delay timer function, activated via dedicated buttons and time settings.
Familiarize yourself with any error code indicators on the display. Refer to the troubleshooting section of this manual for explanations of common codes. A clear understanding of the control panel is essential for navigating the machine’s features and achieving optimal baking results.
Key Features of the Breadman Ultimate
The Breadman Ultimate boasts several features designed for convenient and consistent bread making. A standout is its variety of pre-programmed cycles, catering to diverse bread types – from basic white to gluten-free options. The adjustable crust control allows customization, delivering loaves ranging from lightly golden to deeply browned.
The delay timer is a significant convenience, enabling you to schedule baking up to 13 hours in advance. Many models include a “keep warm” function, maintaining bread temperature after baking. The removable bread pan and kneading paddle simplify cleaning.
Furthermore, the machine often features a viewing window, allowing you to monitor the baking process without interrupting it. These features combine to offer a user-friendly and versatile bread-making experience.
Cycle Options Explained
The Breadman Ultimate offers a diverse range of pre-programmed cycles to accommodate various baking needs. The Basic cycle is ideal for standard white bread recipes, while Whole Wheat is optimized for denser, whole-grain loaves. French creates breads with a crispier crust, and Sweet is tailored for enriched doughs like brioche or cinnamon swirl.
A Dough cycle allows for manual shaping and baking, and Rapid Bake shortens the baking time for quicker results. Gluten-Free cycles are specifically designed for gluten-free flour blends. Some models include specialized cycles like Cake or Jam.
Understanding each cycle’s specific settings – kneading, rising, and baking times – is crucial for optimal results. Refer to the included recipe guide for recommended cycle selections.
Crust Control Settings
The Breadman Ultimate provides adjustable crust control settings, allowing you to customize the color and texture of your bread’s exterior. Typically, options include Light, Medium, and Dark crusts. Selecting a darker setting extends the baking time, resulting in a richer, more deeply browned crust.
A lighter setting reduces baking time for a paler, softer crust. Experimenting with these settings is key to achieving your preferred level of crispness. Factors like ingredient hydration and sugar content can also influence crust development.
Remember that higher altitudes may require adjustments to the crust setting. Consistent results are achieved through careful observation and noting the settings used for each recipe.
Delay Timer Functionality

The Breadman Ultimate’s delay timer allows for convenient, freshly baked bread even with a busy schedule. You can delay the start of the baking cycle by up to 13 hours. This feature is ideal for preparing dough overnight for a morning bake, or setting the machine to finish just before you arrive home.

When using the delay timer, avoid adding perishable ingredients like milk, eggs, or fresh yeast directly into the bread pan. Instead, utilize the dispenser for these items, ensuring they are added at the appropriate stage of the cycle.
Always verify the timer is set correctly and consider room temperature, as warmer environments may affect rising times.
Preparing for Your First Bake
Before your inaugural bake with the Breadman Ultimate, a crucial “burn-off” cycle is recommended. This initial cycle, often the “Rapid White” setting, eliminates any manufacturing oils or residues from the bread pan and kneading paddle. Simply add the ingredients as if making a loaf, but discard the finished product – do not consume it.
Ensure your machine is placed on a stable, level surface, away from water sources. Familiarize yourself with the control panel and cycle options. Gather all necessary ingredients and measuring tools.
A test run builds confidence and ensures everything functions correctly before committing to a full recipe.

The Importance of Ingredient Quality
Achieving exceptional bread with your Breadman Ultimate hinges significantly on the quality of ingredients used. Freshness is paramount; expired yeast, for instance, will result in a loaf that fails to rise adequately. Opt for bread flour with a higher protein content for optimal gluten development, leading to a chewier, more structured crumb.
Water temperature is also critical – lukewarm water (around 80-85°F or 27-29°C) activates the yeast effectively. Using high-quality fats, like butter or olive oil, enhances flavor and texture.
Avoid substituting ingredients without understanding their impact on the final product. Superior ingredients translate directly into superior bread!
Measuring Ingredients Accurately
Precision is key when baking with your Breadman Ultimate. Unlike some culinary endeavors, bread making demands accurate ingredient measurements for consistent results. Always use dry measuring cups for flour, leveling off the top with a straight edge – avoid scooping directly from the bag, which compacts the flour.
Liquid ingredients should be measured in liquid measuring cups, checking at eye level for accuracy. Weighing ingredients, particularly flour, using a kitchen scale is the most precise method and highly recommended for consistent outcomes.
Small inaccuracies can significantly impact the dough’s consistency and the final loaf’s texture. Following the recipe’s measurements diligently ensures baking success!
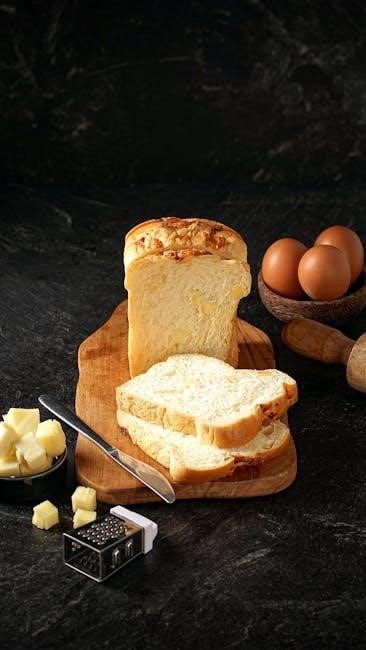
Making Basic White Bread
Let’s begin with a classic! This recipe provides a foundation for understanding your Breadman Ultimate’s capabilities. Start by adding the ingredients – typically water, sugar, salt, oil, and flour – to the bread pan, ensuring the yeast is placed on top of the flour, away from liquids.
Select the “Basic” cycle, choosing your desired crust color. Press start, and let the machine handle kneading and rising. Monitor the dough during the initial kneading phase; it should form a smooth, elastic ball.
Once the cycle completes, carefully remove the loaf and allow it to cool completely on a wire rack before slicing and enjoying your freshly baked bread!
Step-by-Step Dough Cycle Instructions
Utilizing the Dough Cycle: This function is perfect for breads requiring hand-shaping or baking in a conventional oven. Begin by adding ingredients – water, yeast, salt, sugar, oil, and flour – to the bread pan, following your chosen recipe. Ensure yeast isn’t directly contacting liquids.
Select the “Dough” cycle on your Breadman Ultimate. The machine will knead the dough, allowing it to rise within the pan. Once the cycle finishes, remove the dough. It should be smooth and elastic.
Now, proceed with shaping, proofing, and baking in a preheated oven according to your recipe’s instructions. This cycle offers flexibility for artisan breads and beyond!
Baking Bread: Monitoring and Adjustments
Observing the Bake: During the baking cycle, periodically check the bread’s color through the viewing window. If it’s browning too quickly, reduce the crust setting for subsequent bakes. Conversely, if it’s pale, increase the crust setting.
Listen for consistent kneading sounds; changes can indicate issues. If the machine stops mid-cycle, a power outage may have occurred (see troubleshooting). Gently tap the side of the machine to redistribute ingredients if needed.
Avoid opening the lid frequently, as this releases heat and can affect the rise. Once the cycle completes, promptly remove the bread to prevent condensation and sticking. Enjoy!
Advanced Bread Recipes
Beyond Basic Loaves: The Breadman Ultimate excels with complex recipes. Explore artisan breads like sourdough (requiring a pre-ferment), brioche (enriched with butter and eggs), and focaccia (Italian flatbread with toppings).
Experiment with additions like olives, sun-dried tomatoes, cheeses, and herbs. Utilize the dough cycle for shaping and second-rising before a final bake. Remember that higher hydration doughs may require adjustments to the cycle time.
Consider incorporating different flours – rye, spelt, or even gluten-free blends – to expand your baking repertoire. Online communities offer a wealth of inspiration and tested recipes specifically for bread machines.
Whole Wheat Bread Variations
Nutritious & Flavorful: The Breadman Ultimate handles whole wheat beautifully. Start by substituting up to 50% of the white flour with whole wheat for a milder flavor. Gradually increase the percentage as you become comfortable.
Whole wheat absorbs more liquid, so you may need to add 1-2 tablespoons of water. Honey or molasses enhance the flavor and counteract any bitterness. Consider adding vital wheat gluten (1-2 tablespoons per loaf) to improve rise and texture.
Explore variations like honey wheat, cinnamon raisin, or multi-grain using seeds and oats. Experiment with different whole wheat flours – white whole wheat offers a lighter color and milder taste.
Sweet Bread and Dessert Recipes
Beyond Loaves: Your Breadman Ultimate isn’t just for traditional bread! Explore delightful sweet breads and even dessert recipes. Reduce yeast slightly (about 1/4 teaspoon) when adding significant sugar.
For cinnamon swirl bread, layer a mixture of cinnamon, sugar, and butter between dough folds before the final rise. Chocolate chip bread is simple – just add chocolate chips during the dough cycle. Pumpkin bread, banana bread, and apple cinnamon bread are also excellent choices.
Experiment with glazes and icings after baking. Remember to monitor the baking process closely, as sweet breads tend to brown faster. Adjust baking time accordingly for perfect results!
Gluten-Free Baking with the Breadman Ultimate
Adapting to Gluten-Free: While not specifically designed for gluten-free baking, the Breadman Ultimate can be used with appropriate adjustments. Gluten-free flours lack the elasticity of wheat flour, requiring binding agents.
Use a gluten-free bread flour blend containing xanthan gum or guar gum. These gums mimic gluten’s structure. Add 1-2 teaspoons of xanthan gum per cup of gluten-free flour if your blend doesn’t include it.
The dough will be wetter and stickier. Reduce liquid slightly (1-2 tablespoons). Utilize the “Gluten-Free” cycle if available, or the “Sweet” cycle for a longer rise. Monitor closely; gluten-free breads often require shorter baking times.
Troubleshooting Common Issues
Addressing Problems: Encountering issues? Don’t worry, many are easily resolved. A common complaint is the machine beeping and displaying error codes – consult the manual for specific meanings. A machine that won’t power on, as some users report, may indicate a fried power supply, potentially requiring professional repair.
If bread isn’t rising, ensure yeast is fresh and activated correctly. Check ingredient measurements and room temperature. A power outage during baking? Don’t open the lid immediately. Once power returns, allow the cycle to complete.
Online forums reveal frequent questions about machine functionality. Remember to consult the official manual and Breadman’s customer support for tailored assistance.
Bread Not Rising Properly

Troubleshooting Rise Issues: A loaf that fails to rise is a common frustration. First, verify your yeast’s freshness; expired yeast is a primary culprit. Ensure proper activation – lukewarm water (around 105-115°F) is crucial. Incorrect ingredient measurements, particularly flour and liquids, can also hinder rising.

Room temperature plays a role; a cold environment slows yeast activity. Overmixing can develop too much gluten, resulting in a dense loaf. Conversely, insufficient kneading may not develop enough gluten structure.
Check the bread machine’s paddle – is it properly kneading? Finally, ensure the correct cycle is selected for your recipe. Experimentation and careful observation are key to achieving a perfect rise.
Machine Beeping and Error Codes
Decoding Signals: Your Breadman Ultimate communicates through beeps and error codes. Frequent beeping often indicates a simple issue, like an open lid during operation. However, persistent or patterned beeps signal a problem requiring attention.
Consult the manual for specific error code definitions. Common codes relate to ingredient imbalances, a stuck paddle, or a heating element malfunction. A “fried” machine, as reported by some users, suggests a potential power supply failure – professional repair may be necessary.
Before assuming a serious issue, ensure the machine is correctly assembled and plugged into a functioning outlet. Resetting the machine (unplugging for a few minutes) can sometimes resolve minor glitches.
Power Outage During Baking
Unexpected Interruptions: A power outage mid-cycle can be frustrating, but your Breadman Ultimate is designed to mitigate issues. The machine typically attempts to resume operation once power is restored, but the duration of the outage is critical.

If the outage is brief (under 15 minutes), the machine will likely pick up where it left off. However, for longer outages, the dough may deflate or ingredients may separate. It’s best to assess the dough’s condition.
If the dough appears viable, gently knead it and allow it to rise again before resuming the baking cycle. Discard the dough if it shows signs of spoilage. Always prioritize safety and avoid attempting to restart the machine if you’re unsure.
Cleaning and Maintenance
Preserving Performance: Regular cleaning is vital for maintaining your Breadman Ultimate’s longevity and hygiene. Always unplug the machine before cleaning. The bread pan and kneading paddle are removable and dishwasher-safe, though hand washing with warm, soapy water is recommended for delicate finishes.
Wipe the exterior with a damp cloth; avoid abrasive cleaners. Never immerse the main unit in water. Pay attention to the heating element and ensure it remains free of crumbs. A dry brush can effectively remove debris.
For stubborn residue, a paste of baking soda and water can be gently applied. Proper maintenance ensures consistent baking results and prevents unpleasant odors. Store the machine in a cool, dry place when not in use.
Cleaning the Bread Pan and Paddle
Essential Post-Bake Care: After each use, promptly remove the bread pan and kneading paddle from your Breadman Ultimate. These components are typically non-stick coated, so avoid abrasive scrubbers that could damage the surface.
Both the pan and paddle are dishwasher safe, offering a convenient cleaning option. However, hand washing with warm, soapy water is often preferred to preserve the non-stick coating’s integrity. For baked-on residue, soak in warm water before washing.
Ensure both are completely dry before reinserting into the machine. Inspect the paddle for any signs of wear and tear. Proper cleaning prevents buildup and ensures optimal performance.
Exterior Cleaning and Care
Maintaining Your Machine’s Appearance: Regularly cleaning the exterior of your Breadman Ultimate keeps it looking its best and prevents dust buildup. Always unplug the machine from the power outlet before cleaning.

Use a soft, damp cloth to wipe down the housing. Avoid harsh chemicals, abrasive cleaners, or excessive water, as these can damage the finish. For stubborn stains, a mild dish soap solution can be used, followed by a clean, damp cloth to rinse.
Pay attention to the control panel, gently wiping away any crumbs or spills. Ensure the area is completely dry before plugging the machine back in. Consistent exterior care extends the lifespan and maintains the aesthetic appeal of your Breadman Ultimate.
Long-Term Storage Instructions
Preparing for Extended Non-Use: If you plan to store your Breadman Ultimate for a prolonged period, proper preparation is crucial. Begin by thoroughly cleaning the bread pan, paddle, and the machine’s interior, ensuring all components are completely dry.
Unplug the machine and store it in a cool, dry place, away from direct sunlight and extreme temperatures. Avoid storing it in damp basements or hot attics. It’s recommended to store the machine in its original packaging, if available, to protect it from dust and potential damage.
Loosely wrap the power cord to prevent kinks. Periodically check the machine during storage to ensure no moisture has accumulated. Following these steps will help maintain its functionality for future use.
Safety Precautions
Important Safety Guidelines: Always ensure the Breadman Ultimate is placed on a stable, heat-resistant surface away from flammable materials. Never immerse the machine base in water or any other liquid. Avoid touching hot surfaces, such as the bread pan and heating element, during or immediately after baking – use oven mitts.
Unplug the machine before cleaning and allow it to cool completely. Do not operate the appliance with a damaged cord or plug. Keep the machine out of reach of children. Never attempt to repair the machine yourself; contact qualified service personnel for assistance.
Exercise caution when removing the hot bread pan. Ensure proper ventilation during operation. Always follow the instructions outlined in this manual to prevent potential hazards.
Understanding the Warranty Information
Breadman Ultimate Warranty Details: Your Breadman Ultimate is covered by a limited warranty against defects in materials and workmanship. The standard warranty period typically begins from the date of original purchase. Please retain your proof of purchase for warranty claims.
The warranty generally covers defects under normal household use, but does not extend to damage resulting from misuse, accidents, or unauthorized repairs. Modifications to the appliance will void the warranty. Specific warranty terms, duration, and coverage may vary depending on your region and retailer.
For complete warranty details and claim procedures, please refer to the separate warranty card included with your machine or visit the official Breadman website at www.breadman.com.
Resources and Further Support
Need additional help with your Breadman Ultimate? Several resources are available to enhance your bread-making journey. Start with the official Breadman website (www.breadman.com) for frequently asked questions, troubleshooting guides, and downloadable recipes.
Explore vibrant online recipe communities and forums dedicated to bread machines, where users share tips, modifications, and creative recipes. You can often find scanned copies of older manuals and helpful discussions regarding common issues. The Manual Library also hosts user-uploaded manuals, including those for the Breadman Ultimate.
For direct assistance, contact Breadman Customer Support. Details for contacting them, including phone numbers and email addresses, are typically found on their website; Don’t hesitate to reach out – they are equipped to address specific concerns and provide expert guidance.
Downloading the Official Manual (PDF)
Accessing a digital copy of your Breadman Ultimate instruction manual is simple! While the physical manual is a valuable resource, a PDF version offers convenient access on your computer, tablet, or smartphone. Several online repositories host downloadable manuals for various Breadman models.
Begin your search on the Breadman website (www.breadman.com), where you may find a dedicated support section with downloadable PDFs. Alternatively, explore websites like The Manual Library, which often features user-uploaded manuals, including those for older Breadman machines. Be sure to verify the model number (TR2200C) to ensure you download the correct manual.
Downloading the PDF allows you to quickly reference instructions, recipes, and troubleshooting tips without needing the physical booklet. It’s a practical solution for keeping your manual readily available wherever you go!
Online Recipe Communities
Expand your baking horizons with vibrant online communities dedicated to bread machines! Numerous forums and websites offer a wealth of recipes, tips, and troubleshooting advice specifically for the Breadman Ultimate and similar models. These platforms are invaluable for sharing experiences and discovering new techniques.
Search online for “bread machine recipes” or “Breadman Ultimate forum” to find active communities. Many users share their adapted recipes, gluten-free variations, and solutions to common issues. These communities often feature dedicated threads for specific models, allowing you to connect with fellow bakers facing similar challenges.
Don’t hesitate to ask questions, share your successes, and contribute your own recipes – it’s a fantastic way to learn and enhance your bread-making skills!
Contacting Breadman Customer Support

For dedicated assistance with your Breadman Ultimate, reaching out to customer support is a valuable resource. While specific contact details may evolve, the official Breadman website (www.breadman.com) is the primary starting point for support information.
Look for a “Contact Us” or “Support” section on the website. This typically provides options such as a frequently asked questions (FAQ) database, email support, and potentially a phone number for direct assistance. Be prepared to provide your machine’s model number (TR2200C) and a detailed description of your issue.
Before contacting support, reviewing the troubleshooting section of this manual and online forums may resolve common problems quickly. Retain your proof of purchase for warranty claims.